How to add a menu bar to the top of your blog!
When I decided to add a menu bar at the top of my blog I wasn't able to find a lot of resources to help me, so I wanted to share this tutorial.
How I created menu buttons for my blog--
I started with this tutorial from Emilee and Grace:
........................................................................................
How to add a menu bar (and a few additional widgets - or gadgets they're now called) to your Blogger layout. If you want your layout to look like the image below (circled items are the ones that will be added to your existing layout), follow these easy steps. 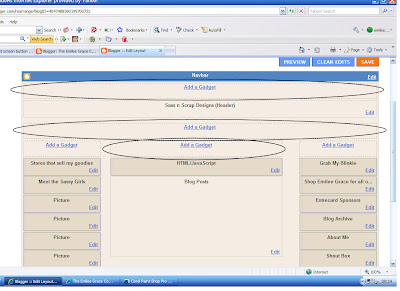
Log into your Blogger account. Click on the Layout tab. Click on Edit HTMLPress Cntrl+F to open up the "find" boxType showaddelement (all one word)You will see something like this:<b:section class='header' id='header' maxwidgets='2' showaddelement='no'>
Everywhere that it says 'no', you will change to 'yes'.
****ONLY WHERE IT FOLLOWS showaddelement. There should be about 3 places that you are going to change it from 'no' to 'yes'. You will probably have to scroll down a tiny bit to change all of them.
Click Save Template
You are done! You are now able to add a widget above your blog posts, under your blog header (or above it).
........................................................................................................................................
And here's where I had to figure it out on my own:
Create your buttons using Paint (I've included directions at the bottom on how to add simple text links if you don't want to make your own buttons)
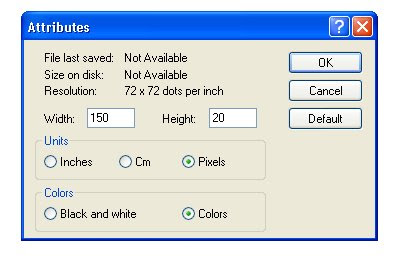
1. Select IMAGE>ATTRIBUTES. Change the height and width to the desired dimensions. If you would like to make the menu stretch across your entire header, divide your header width by the number of buttons you want. My buttons are 150 pixels by 20 pixels.
2. Change the background color to the color you'd like to use for your buttons. Click the fill button on the toolbar (the one that's highlighted), select the color for your buttons, and click the rectangle on the page. This will turn the entire rectangle to the color of your choice.
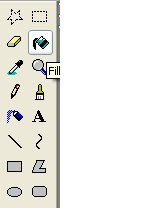
3. Add text. Choose the Text Tool (the capitol A in the picture). Click on the top left corner of your rectangle, drag it down to the bottom, and then drag it to the other side (don't let go of the button on your mouse until you've selected the entire shape). Select the color that you'd like your text by clicking on the color at the bottom, and then just type in your chosen word. Center it by adding spaces at the beginning until it looks like it's in the middle. If you want to change the font then go to VIEW>TEXT TOOLBAR, and make sure it is checked. You can then highlight the word with the mouse and select the font that you'd like (you can arrow down to see your word in different fonts).
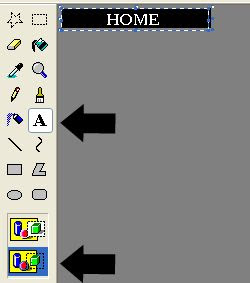
This button at the bottom lets you keep your text box opaque so the color of the rectangle shows through.
**If you ever click outside of the box after you've added text it will no longer let you edit the text and you'll have to start over if you need to make a change.
4. Save your button by selecting FILE>SAVE AS.
5. Upload your buttons to a photo hosting service such as photobucket.
NOW WE WILL ADD THE BUTTONS TO YOUR BLOG (Thanks so much to Real Life who helped me figure out this part)
(***For simple text links you will start at this step)
1. Make sure you have a post for each page you want to link on your menu bar. If you don't then write a new post that you'd like to link to. The most common are Home, About, Contact, but you can do anything.
- The links you use will be the URL for each specific post.
- For Home, it will be your blog URL.
- For Contact, it will be mailto:youraddress@email.com
2. If you want your menu to have your header's background color:- On your Template/Layout, click the very top rectangle under navbar, where it says add a page element. Anything you put in this top box will have your header background color from your title header. (If you have a custom header, the background for this box will still be the original header background color.)
If you want your menu to have your posts' background color:
- On your Template/Layout, click the rectangle under your Header, which says Add a Page Element
3. Choose HTML/Javascript. In the content box, add the HTML tag for your buttons from Photobucket. The code will look something like this:
<a href="
http://rhbdesigns.blogspot.com" target="_blank"> <img src="
http://i77.photobucket.com/albums/j46/borskydre/homebutton1.jpg"/></a>
The text in red you will change to your link URL, and the text in blue you will change to your image URL.
at the very beginning, and
Just enter the code for each button right under the other.
4. After you add all your buttons center them by adding <center> at the beginning, and
</center> at the very end.
5. Save by selecting Save Changes.
To create simple text links (easier than making your own buttons!) simply follow the Emilee and Grace tutorial at the beginning, then skip to the step that says "add the buttons to your blog". At step 3 instead of entering the html for your buttons you will add this html:<a href=
http://yourblog.blogspot.com>HOME </a>
<a href=
http://your aboutpageURL>ABOUT </a>
<a href=
http://yourfavoritepostsURL>FAVORITES </a>
<a href=mailto:
youraddress@email.com>CONTACT </a>
Change the blue text to your own links, and the words in caps can be changed to anything else you want on your menu bar.
Each word is separated with a vertical line (located below the backspace on your keyboard).
- Then click and drag the new page element to just under your header.
- Preview to see if you want to change anything.
- Click Save.
Hope this is helpful!!